Django Application Monitoring (APM) with StatsD
One of the basic tenets in DevOps is that we measure EVERYTHING.
StatsD is the open-source darling that has quickly turned into our tool of choice for measuring "all the things". StatsD is logging for metrics.
Instrumenting your application code via StatsD is lightweight, both in terms of syntax and overhead. It's the missing swiss army knife in your measurement toolbelt.
However, there are two sides to the StatsD equation:
- Instrumenting your code (easy)
- Setting up infrastructure to view your metrics
...well that second step is pretty involved. I'm antsy to get some StatsD in place. Let's cheat: we'll use use Scout as our StatsD backend.
1Installation
Thanks to Andy McKay and his solid django-statsd extension, we've got a great starting point. I modified the base repository to simplify around a core application metric set:
- Request Throughput
- Response Time: Mean & Upper 95th Percentile
- Error Rate
Note: For additional options within the package, please refer to the original project documentation.
In your existing Django application start by adding the scout_statsd_django package.
pip install git+git://github.com/scoutapp/scout_statsd_django.git
Next, update settings.py and add the following middleware to the top of the list:
 MIDDLEWARE_CLASSES = (
    'django_statsd.middleware.StatsMiddleware', )
    + MIDDLEWARE_CLASSES
Restart your application for the new settings to take effect.
2Scout
As mentioned, we're going to use Scout vs. rolling our own StatsD infrastructure. It's easy, and if you decide Scout isn't right for you, you're not locked in. Just swap Scout out with your home-grown backend!
New to Scout? Start your Scout trial and then follow our agent install instructions.
Already running Scout? If you already running the current version of scoutd, you're done! Wasn't that easy?
Browse around on your site and purposely generate a few 404 and 500 errors. Next, check your Scout account. Within a minute, under the custom metrics tab, you'll see counts of the response codes reporting - as well as throughput times.
If you don't see any custom metrics, please check the scoutd upgrade instructions.
3Custom Metrics
Basic APM is nice, but the true power of StatsD is in defining custom metrics. We've already got the infrastructure in place, so the implementation is easy. In your code simply add:
 from django_statsd.clients import statsd
 statsd.incr('my_custom_metric')
Our StatsD documentation details all the metrics types available to your application.
4Alerting
Displaying a metric catches us up with Graphite. Let's take it one step farther and add a notification for the most critical metric: error rate.
We'll add our alert to the 'All Servers' role in Scout. As we add servers, this will ensure that we get notified if one of our servers starts spewing errors.
First, browse to the 'All Servers' role in Scout. Next, select 'Custom Metric' in the add a new trigger template drop down.
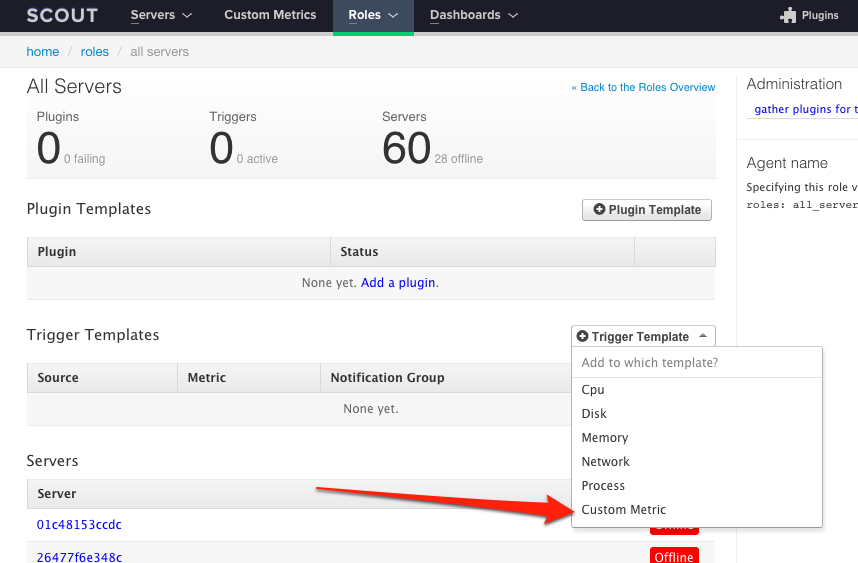
On the next screen, select the 'django.response_codes.5xx' metric. We'll set it to notify us if 5 or more errors occur within a minute.
Note: If django.response_codes.5xx is not available, make sure you generate 5xx errors within your site to register the metric
Finally, go back to your app and generate five or more errors within a minute. Within a few minutes, you will receive an email notifying you of the errors. Once you stop generating errors, you'll receive another email indicating that things have returned to normal.
TL;DR
Spring 2018 Update - This post covers instrumenting a Django app with StatsD. For a more full-featured APM solution, checkout Scout's Python Application Monitoring.
StatsD doesn't have to be complicated. You don't have to spend long engineering hours in putting together a multi-tiered solution. As seen here, you can have a quick and easy Django application monitoring solution (with custom metrics and alerting) with a simple package install and a couple lines of code. Add up the benefit to your entire team, and you'll see why Scout is a great solution for hosted StatsD.
Questions? Contact us here. Follow us on Twitter for additional updates.